
It is, of course, the key question for every student: Now how do you remember the most important things from the book you are reading? Some prefer to make summaries of the book. Another underlines the key thoughts from the book with pencil. And a third marks the most important passages with a bright highlighter. In this weblog I describe how to study exactly this way with Logos Bible Software.
Literature Review Layout
The first step is to create a Literature Study Layout, which you then save for future use. This will help you build a routine in your study. Below is an example of such a literature review layout, discussed step-by-step.
The literature review layout consists of the following sections:
- A book
- A highlighter palette
- Window with notes
- A search window for searching in highlighted text
- A search window for finding annotations to highlighted text
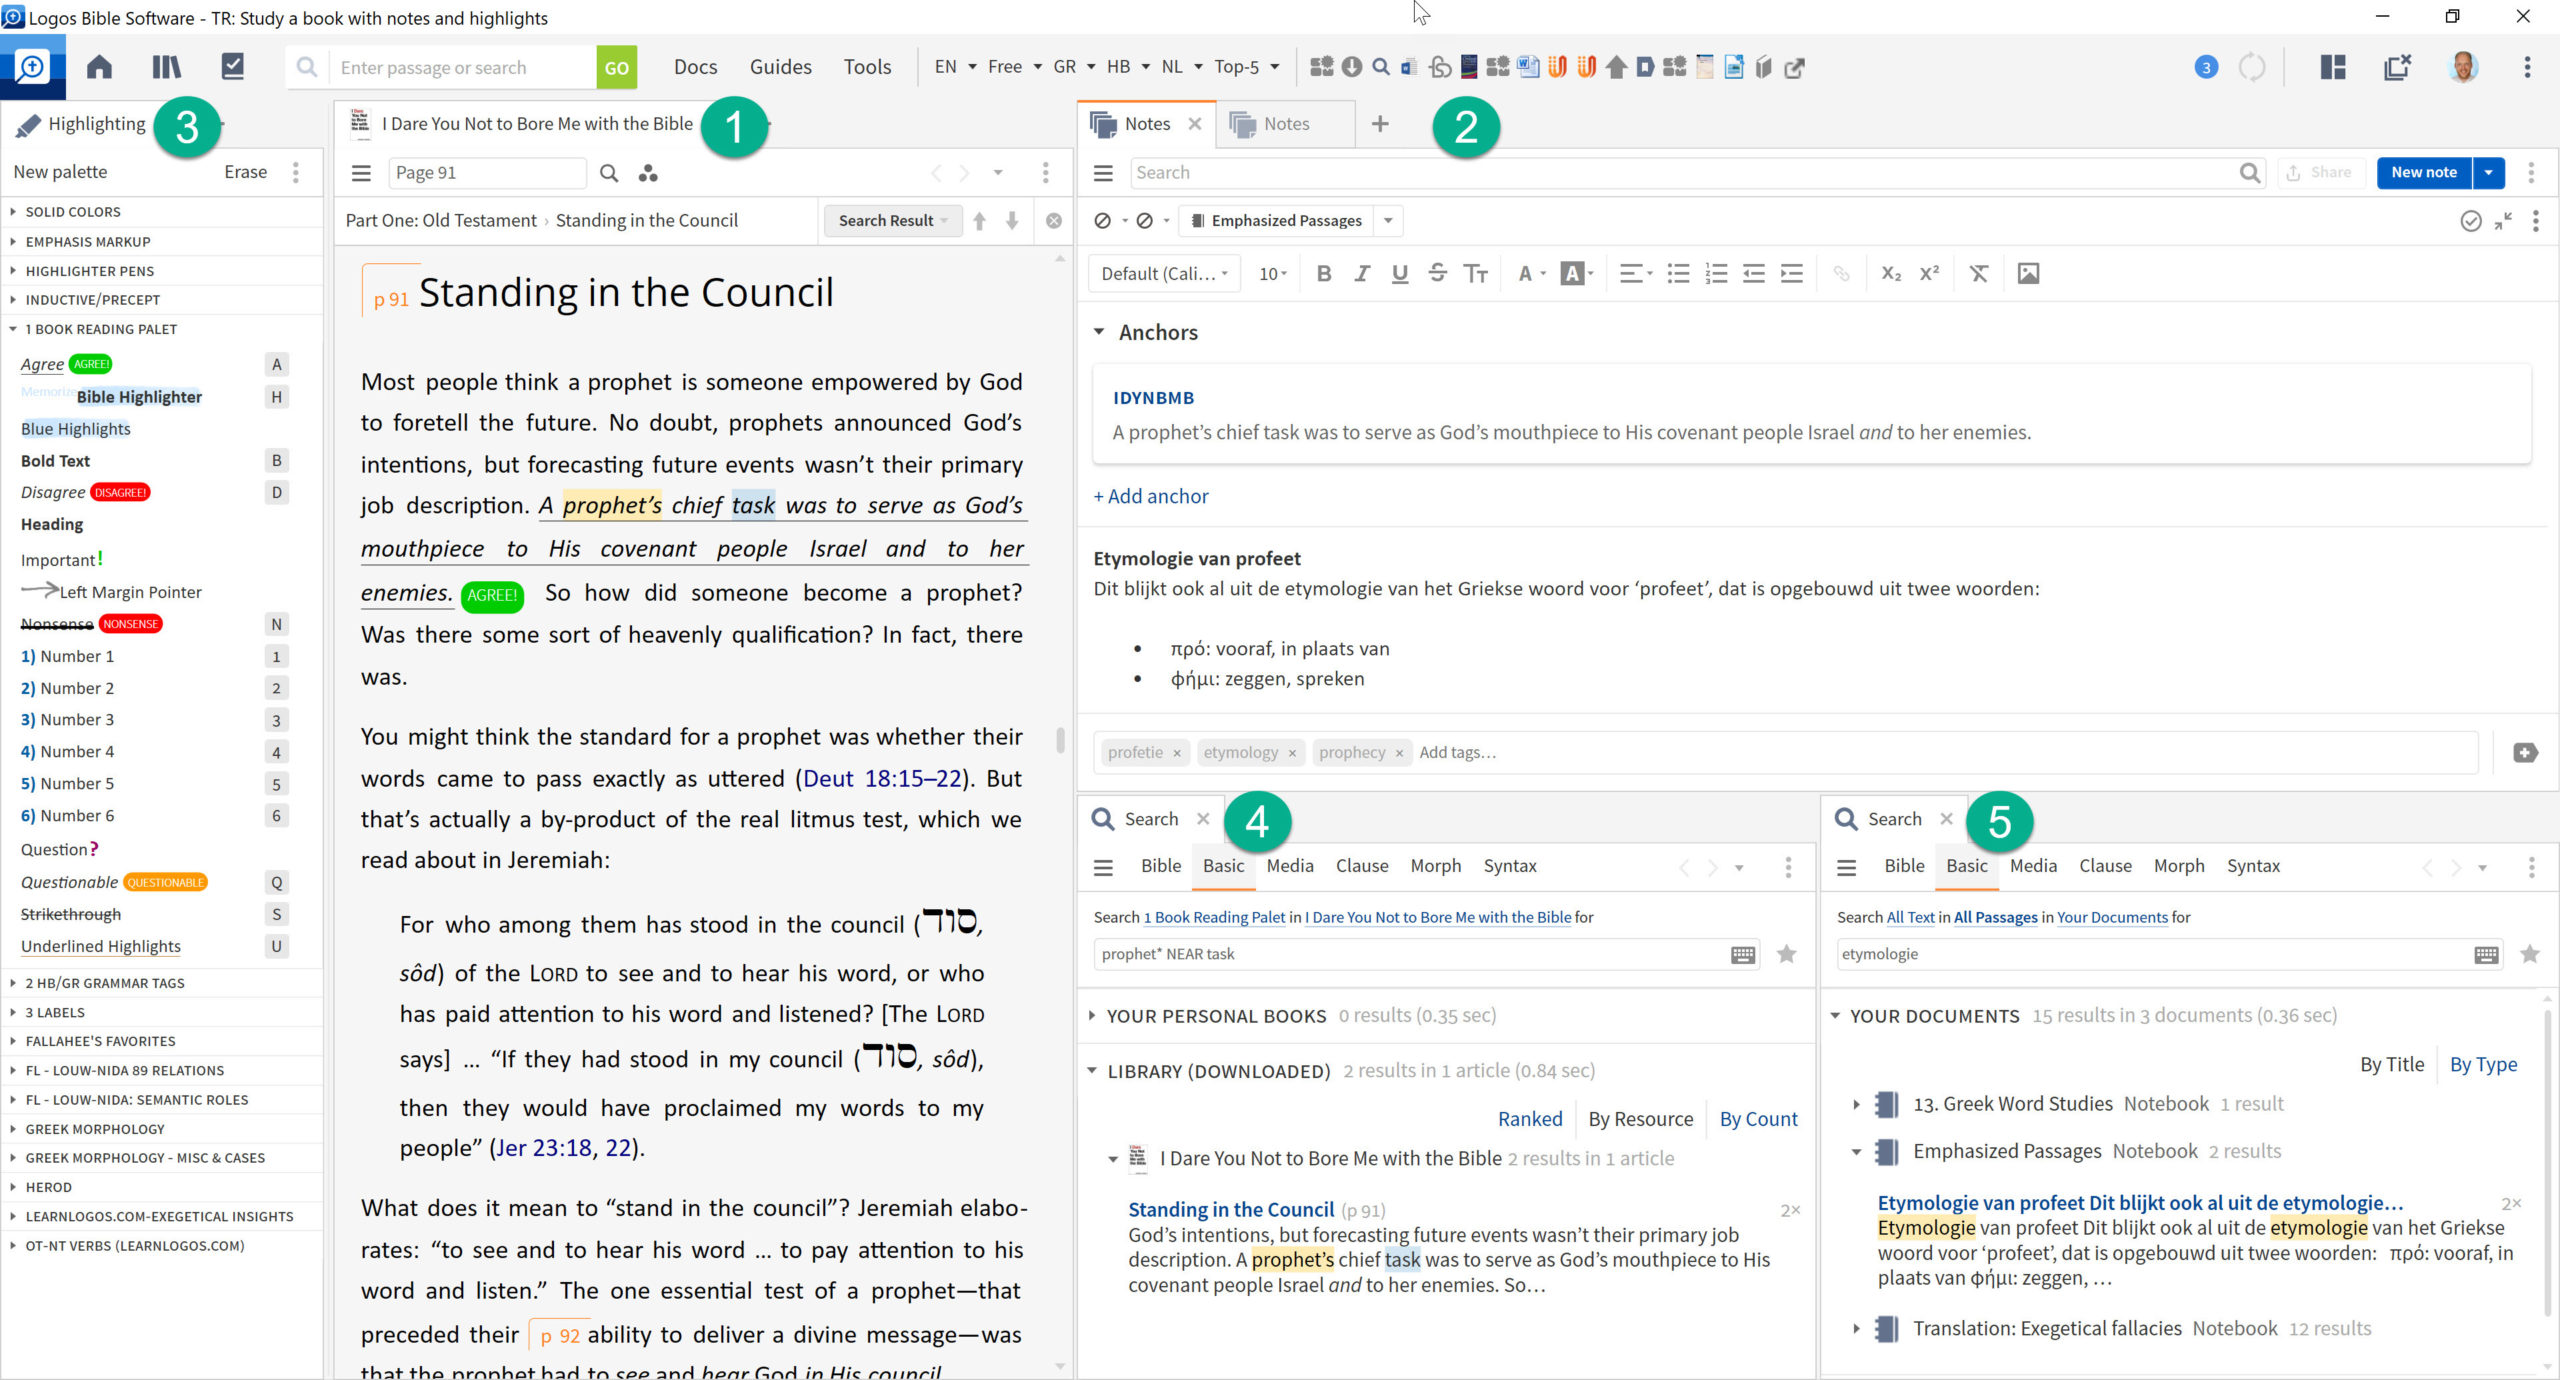
1. Select a book to study
In this example, we have chosen a book that excels in originality. First of all, the title is already very challenging: I Dare You Not to Bore Me with the Bible. In it, the author describes how his students sometimes have very low expectations of studying the Bible. Many students with a Christian background think they know the Bible. But Michael S. Heiser takes the reader in this book to passages that are often ignored. Precisely because they are so difficult, or because the reader is so unfamiliar with the Eastern cultural background of those passages. The result is a book that does not bore a moment!
2. Choose or make your own highlighter palette
When you're studying, you often want to underline an important sentence or highlight an entire paragraph. Or you may want to put an exclamation point next to a quote you think is important. Or you might write "disagree" to an author's comment with which you disagree. In this way, you are 'in conversation' with the author of your book, so to speak.
Logos allows you to highlight and annotate your text in numerous ways, and for that you use the Highlighting Tool. By default, Logos already has a range of highlighting options , but you can also create your own marking palette.
In the example layout, I'm using one of those personalized highlighting palettes that I've called "1 Book Reading Palette. In doing so, I created a style for different things I want to be able to do with a text:
- Consent: If I really agree with something, I select the text, press the A key and the text becomes italicized and underlined and a label 'AGREE' comes after it.
- Bold: sometimes I want to emphasize something and for that I can use the B key to make something bold.
- Disagree: If I disagree with a particular statement, I select the text and press the D key of 'disagree'. The text then becomes italicized and a label 'DISAGREE' appears behind it.
- Important: important text I can mark with an exclamation point.
- Nonsense: nonsense text I just cross out, and stick the label 'NONSENSE' behind it.
- Questionable: and if something is questionable, I select the text and press the Q key for "questionable.

This allows you to see at a glance what you think is important, what you agree or disagree with, and what you want to explore further. All markings are stored by Logos as a visual filter. So when you read the book If you want to read it again, but without the markings, you can disable the corresponding visual filter and all markings will be gone!
3. Keep your notes in a notebook
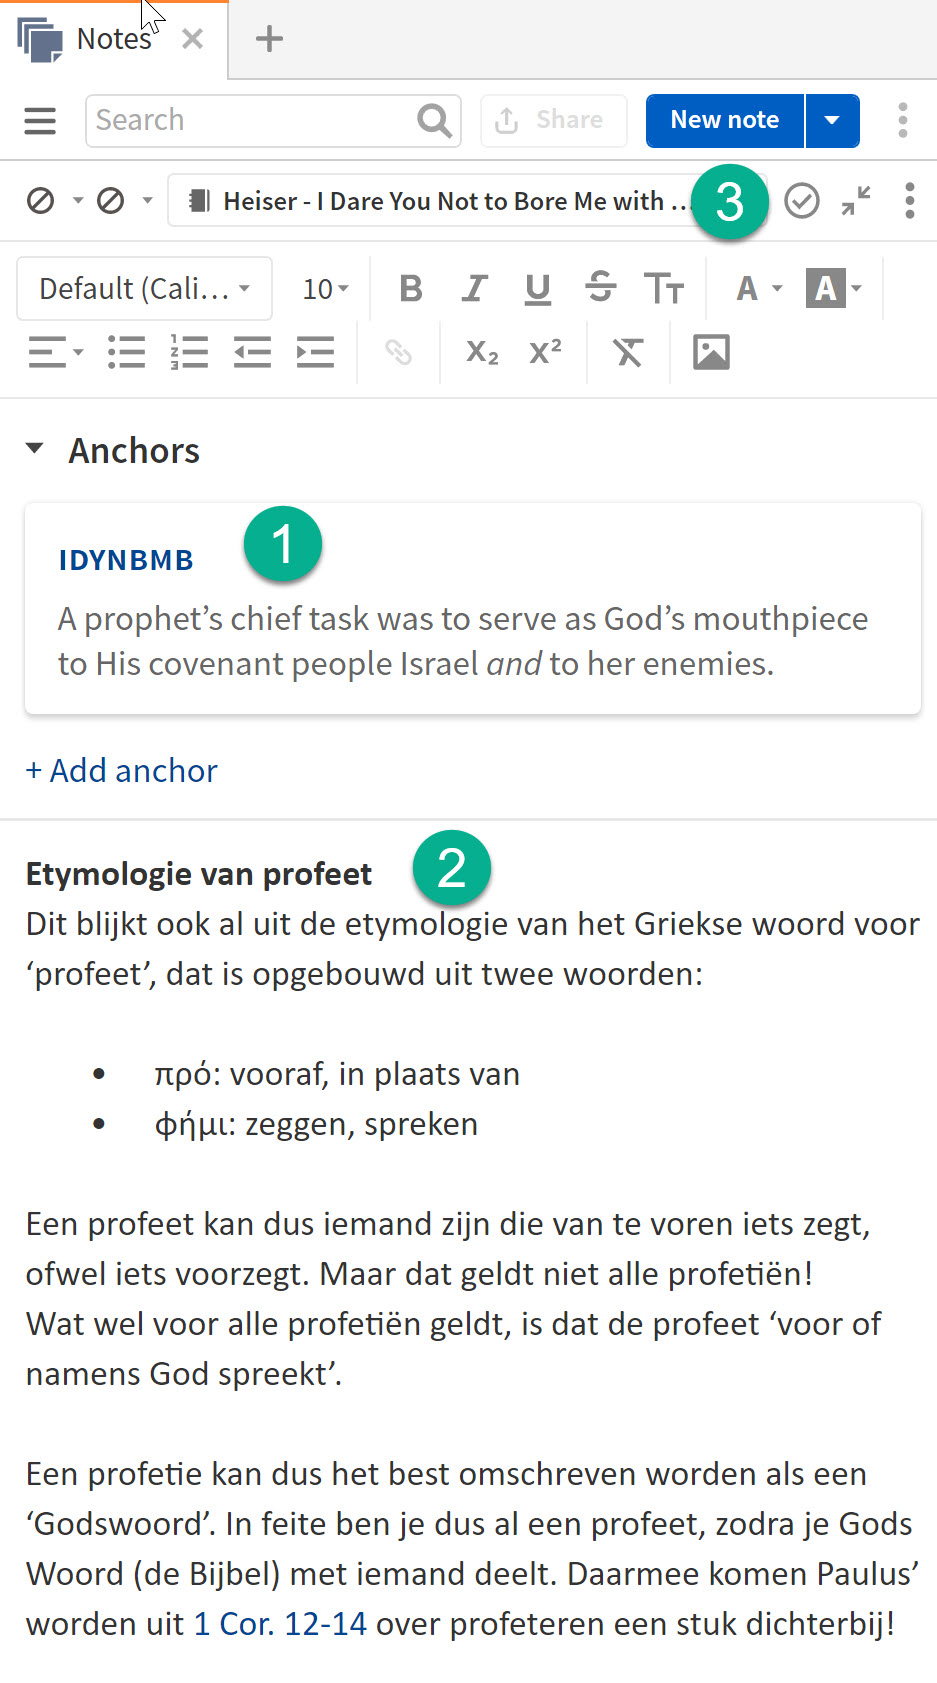
In the image to the right you can see that the selected text is anchored (1) to the book (abbreviated with IDYNBMB). If desired, you can also anchor this text to a Bible text. In that case click on 'Add anchor'.
In addition to marking the text, I also added a note (2) on the etymology of the word "prophet.
I saved both the highlighted text and the note I made with it in a notebook (3). This notebook has the same name as the book I am studying. This allows me to very easily find my notes to this book.
4. Searching in highlighted text
Does it ever happen to you? You're studying a book and at some point you want to go back to that one passage you highlighted. But in which chapter, on which page was that text again? Studying with Logos will save you a lot of time and headaches because Logos allows you to simply search through your highlighted text. Imagine, you remember a comment you marked, about the task of a prophet.
Open a Basic Search (1) and change the search parameters as follows:
- Search in: enter the title of the book you are studying (2)
- Search: select the highlight palette you used when highlighting text in this book (3)

5. Searching your notes for highlighted text
If you want to search your own notes on the selected text, things work a little differently:

- Open a Basic Search, as in the previous search.
- But now you're searching in "Your Documents," because your notes are categorized as "documents" by Logos.
- Type your search term, in this case 'etymology' and hit enter.
- Logos now shows you all your notebooks that contain your search term. Unfold the notebook you took notes in and there's your note.
BONUS: Print your summary
Studying with Logos has never been easier or more effective. You've studied and annotated your Logos book thoroughly and now you want to go over all the main points again before your exam. To do this, you can print a summary of all your highlighted text, including your notes on that highlighted text.

To do this, open the Notes Tool and follow these steps:
- Click on the hamburger icon, which will bring up a window that allows you to filter your notes.
- Click on the notebook icon to filter between your notebooks.
- in the search bar, type part of the title of your notebook, in this case 'Heiser', then select the appropriate notebook.
- Select all your highlights and notes.
- Sort them by date of creation if desired, assuming you study a book from front to back.
- Click Print/Export to print or export your highlighted text including notes to a Word document for further processing.
Good luck studying with Logos Bible Software!


